Sunday, December 21, 2008

Crackle Effect


First try in doing crackle effect. My first victim to the new transformation is a ordinary looking mini flower stand. What I did...first I applied sealer to the flower stand, let the sealer dry. And then apply the background color...I used white as I like white as a background color. But for the upper surface, I applied dark pink color to make contrast with the white.

I applied 2 techniques here to decorate the flower stand, 1) decoupage technique and 2) decorative painting.

The new face


3 basic step crackling process

1) Apply basecoat color (pink), let dry
2) Apply crackle medium, let dry
3) Apply contrasting topcoat color (in my case it's white, topcoat must be applied for cracking to occur)

The crackling will show when paint dries.


Close up


Tips

1) Apply a thin coat of medium for fine cracks, moderate coat of medium for medium cracks and thick coat of medium for large cracks.

2) Do not brush back over previously applied medium that has started to dry as doing so, may cause the crackle medium to lift.

3) When applying the topcoat, do it in one direction n evenly to get best crackle effect. Actually, we also can use sponge/dabbing techniques and we call it as Sponge Crackle. The technique I was using is Brush Crackle.


Crackle on the frame


My reference book, Decorative Painting Techniques by Di Singleton

Folksy Rose


It is a very long time since the last entry, been a bit busy lately. My time packed with household chores. This is not a new project. It was completed 1 and half month ago. It's called Folksy Rose. Based on my new reference book...Decorative Painting by Aniza, Norana n Zaiton. They are the most popular Malaysian decorative painting artists. I wish I have more time to learn decorative painting from them...in person. Their paintings are stunning and beautiful.


The worksheet


TADAAAAA....... the result of my painting


The side of the box


Actually I like to make a lace .....but I couldn't get it right. So, I need to practice a lot to get it right.

Sunday, November 16, 2008

Basic Material

Decoupage or decorating painting needs basic material in doing this art work. The list of things are

1) Brush
There are many types of brush such as flat, round , liner , stippler, angular, filbert n fan brush.
Different brush gives different stroke work.

2) Acrylic Paint
There are many kinds/types of acrylic paint in the market. Usually I used Jo Sonja n Folk Art brand. Others brand in the market are Mattise, Pebeo, Americana etc.

3) Sealer
The purpose of sealer is to cover the surface project from peeling, cracking or powdering off.

4) Varnish
Protect the painting from scratches or water spotting.

5) Sand paper
To give a smooth surface.

6) Wood or MDF (Medium Density Fibreboard) board or metal or recycled materials
Before starting any painting, I will sanding the surface n applying sealer after the sanding process.

7) Gesso ( decoupage )
Apply gesso after applying the sealer....usually I used white Gesso. Dab the gesso using sponge onto project surface.

8) Tracing paper
To trace the chosen pattern

9) Carbon paper
To transfer the chosen pattern onto the work/project surface

Wednesday, November 12, 2008

Rose buds


My latest project.....painting rose buds n leaves on the picture frame. I bought this lovely white frame from IKEA. Apply sealer on the surface n then I started painting the rose buds based on the book ..DECORATIVE PAINTING TECHNIQUE by D'Singleton.


The close up


The book


The instructions

Friday, November 7, 2008

Thursday, October 30, 2008

Wednesday, October 29, 2008

Mom's Cafe


Tissue sample


Mom's Cafe plaque, combination between decoupage and folk art. I just painted some flowers, leaves n roof for the cafe n also the words. The rest, I used decoupage technique.... pasted the whole tissue on the surface of the chopping board.

Coins Box


Coins box made for my daughter. Decoupaged on the Pringles Bottle (Potato Chips Bottle). It was very difficult for me to paste the whole tissue on the surface of the bottle as I'm an amateur. So, what I just do.... I divided the tissue into 4 part and then paste the tissue part by part.


Tissue sample

Friday, October 24, 2008

Folkart aka decorative painting


My first art...Lovely Daisy. Learned with Encik Zahir the owner of Creative Cottage, Amcorp Mall, Kuala Lumpur. Decorative painting is the combination between stroke works and techniques.


This lovely cabbage roses n simple flowers, I learned from U-tube by Donna Drewberry n Ramesh Krish.

Donna Drewberry u-tube

Ramesh Krish u-tube


Birdhouses In The Garden....... learned from book.... Fabulous Painted Projects for The Home by Plaid. It takes 2 weeks to finish it.

Thursday, October 23, 2008

A bunch of roses


Tissue Sample


At the back of the bottle


View from the front of the bottle


Decoupaged on the surface of hand liquid soap bottle.

My first decoupage


Tissue sample


My first attempt to decoupage. Combination between decoupage n folk art. Handmade fridge magnet made from unused prepaid card.

What is decoupage
According to Wikipedia, decoupage is the art of decorating an object by gluing colored paper cutouts onto it in combination with special medium.

Basically,we have to cut out pictures; glue the pictures onto an object; and then cover the object and pictures with a few coats of glue/decoupage medium to protect it.

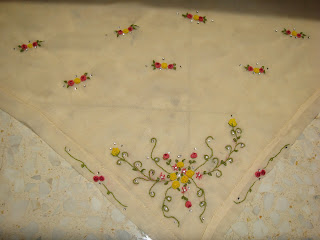
Hand Embroidery - Bullion


My first tudung/scarf


Handmade hat for my daugther. 100% hand sewing. Combination between bullion n lazy daisy.


Bullion on my second tudung/ scarf.

My New Bag


I've learned to make this lovely bag from the magazine. It taken longer time to finish it ..about 3 weeks.

Tuesday, July 22, 2008

Embroidery


The second project of my craft thing is hand embroidery stitch. This is my first attempt to stitch. As usual, internet is my main source of learning everything. Pattern shown is 100% from my own idea. My hand embroidery begins with a few basic stitches. I was using satin fabric, DMC thread and 6" loop.

  • 1) Satin stitch - big flowers and buds
  • 2) Detached Chain aka lazy daisy stitch - yellow flowers
  • 3) French Knot - small pink and red flowers
  • 4) Stem Stitch - stems
  • 5) Fish bone stitch - leaves


For those, who want to start learning embroidery, the link below is a very good guide for learning and practising

http://www.needlenthread.com/2006/06/basic-embroidery-stitches.html


Monday, July 21, 2008

Mini Shoulder Bag

My little daughter become an instant model for displaying the bag.


Actual size of the bag


Close up for the beaded project


My first crafty thing I've ever made. Mini shoulder bag. I've made this bag based on the link below. TQVM for the blogger for sharing her idea to us. Actually, at that time, I was so boring n nothing to do with my day chores, instead playing with Sabrina n do the housework...the rest of time is useless. So, I started browsing the internet, and....wallah...... I found this link at the thread in wanitamelayu.com. With my own creativity, I've resized the measurement and added some beads to make it glittering.

http://tinyhappy.typepad.com/tiny_happy/2006/06/shoulder_bag_tu.html