Wednesday, May 20, 2009

Home Sweet Home


Another decoupage using rosemary rose tissues (if I'm not mistaken for this type of rose). Signage for my front door. Some folk art touch for the stems n red small flowers. Pink outline for the edge of the rose to make it more prominent. And also 3D butterfly.


I used trace n transfer method for the wording. Firstly, I typed the wordings in Word Art and printed it out. Secondly, I traced n transferred the wordings onto the wood surface. Lastly, I painted the words using liner brush.


Close up of the 3D decoupage for the butterfly


I just wanted to share the decals that I bought here at Jarir Bookstore , Meena Centre. Folk Art brand.


Rose stencil n 3D decoupage picture.

Monday, May 18, 2009

Mama & Sabrina Arts & Crafts Day

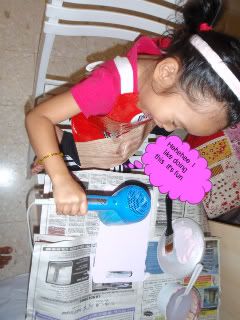
Last weekend, my little girl n me had fun together . Filled up our day with decoupage . She seems very happy doing this. I taught her how to seal the surface, apply background color n paste the picture. Since she was not expert in using scissors, I did it for her....so she just pasted the picture. I let her choose her own pictures n arranged them. It was really fun doing arts & crafts stuff with my little girl.


Apply background color (light pink)


Fast drying process using hair dryer


Varnishing the surface


TADAAAAA


Our craft (how much you think we can sell these...hehe)


Sabrina's craft
The letters written by Sabrina herself. Her hands were shaking that's why the letters are skewed a bit.


Mom's craft
Written by me...... freehand...no copy n tracing method.


Later, after finishing her decoupage she told me that she wants to make another decoupage, thi time with Batman pictures. She wants to give it to her friend..Japothi n Omar Rayyan as a gift. I hope I can do this mom and daughter arts & crafts day often, perhaps making it a tradition between us both.

Monday, May 11, 2009

Teaset


Another rose using angular brush. Actually, I wanted to apply pink color to the rose but later decided the other way round. I used decoupage technique for the background ( like wallpaper) . Applied the whole tissue. If u can see..there were a lot of wrinkles here n there. I'm not expert yet in this. Some of my friends said it is art. As u know..art is very subjective. Different people..different opinion. I've wanted to paint this tea set for a while now. I'm happy to say, without any references..I was able to do it myself.

Rose...rose n rose


My pink rose in my house. It is pretty right?. I like it very much because I'm waited very long to see it bloom. After a few rose plants died...only this one survives. I put everything to make sure it lives. Even banana skin or egg skin i put in as fertilizer. It 's funny, right. Hehehehehee. I saw one movie (Seven Pounds), the actor ask to put banana skin if u want your plant to be healthy. So I try n voila...the leaves came up aggressively. Okay..enough the story of my rose. Let us get back to the point.


I like to paint rose even if it seems difficult to paint sometimes. I don't know what we call this rose painting..but I was using an angular brush to do it. Before painting the rose..i did not apply sealer to protect the candle..I just painted. After a few moments, the paint started to fade....only then do I started to apply the sealer to the surface slowly. Because I was afraid the paint will fade if no sealer was applied.

Monday, March 9, 2009

Kitchen Acessories


Embroidery Cushion Cover


Cutie Bear


Fresh from Oven.....Cutie Bear.....I made it last night. At last...I did it by myself with helping by Annete Stevenston book as a reference . Sabrina said it was really beautiful. She always made me happy with her words even thought the result is not really beautiful. Actually, It is fun to paint bear..really really fun.

This bear is dedicated to my lovely daughter, Sabrina, who always make me happy n encouraged me in everything I do.


I bought this book at Ebay...just a few pounds only. Inside the book...it stated how to paint bears. There are 3 types of painting bears.... long haired bear, Fuzzy bear n old original bear. I just learned how to paint fuzzy bear.

Sunday, December 21, 2008

Crackle Effect


First try in doing crackle effect. My first victim to the new transformation is a ordinary looking mini flower stand. What I did...first I applied sealer to the flower stand, let the sealer dry. And then apply the background color...I used white as I like white as a background color. But for the upper surface, I applied dark pink color to make contrast with the white.

I applied 2 techniques here to decorate the flower stand, 1) decoupage technique and 2) decorative painting.

The new face


3 basic step crackling process

1) Apply basecoat color (pink), let dry
2) Apply crackle medium, let dry
3) Apply contrasting topcoat color (in my case it's white, topcoat must be applied for cracking to occur)

The crackling will show when paint dries.


Close up


Tips

1) Apply a thin coat of medium for fine cracks, moderate coat of medium for medium cracks and thick coat of medium for large cracks.

2) Do not brush back over previously applied medium that has started to dry as doing so, may cause the crackle medium to lift.

3) When applying the topcoat, do it in one direction n evenly to get best crackle effect. Actually, we also can use sponge/dabbing techniques and we call it as Sponge Crackle. The technique I was using is Brush Crackle.


Crackle on the frame


My reference book, Decorative Painting Techniques by Di Singleton

Folksy Rose


It is a very long time since the last entry, been a bit busy lately. My time packed with household chores. This is not a new project. It was completed 1 and half month ago. It's called Folksy Rose. Based on my new reference book...Decorative Painting by Aniza, Norana n Zaiton. They are the most popular Malaysian decorative painting artists. I wish I have more time to learn decorative painting from them...in person. Their paintings are stunning and beautiful.


The worksheet


TADAAAAA....... the result of my painting


The side of the box


Actually I like to make a lace .....but I couldn't get it right. So, I need to practice a lot to get it right.

Sunday, November 16, 2008

Basic Material

Decoupage or decorating painting needs basic material in doing this art work. The list of things are

1) Brush
There are many types of brush such as flat, round , liner , stippler, angular, filbert n fan brush.
Different brush gives different stroke work.

2) Acrylic Paint
There are many kinds/types of acrylic paint in the market. Usually I used Jo Sonja n Folk Art brand. Others brand in the market are Mattise, Pebeo, Americana etc.

3) Sealer
The purpose of sealer is to cover the surface project from peeling, cracking or powdering off.

4) Varnish
Protect the painting from scratches or water spotting.

5) Sand paper
To give a smooth surface.

6) Wood or MDF (Medium Density Fibreboard) board or metal or recycled materials
Before starting any painting, I will sanding the surface n applying sealer after the sanding process.

7) Gesso ( decoupage )
Apply gesso after applying the sealer....usually I used white Gesso. Dab the gesso using sponge onto project surface.

8) Tracing paper
To trace the chosen pattern

9) Carbon paper
To transfer the chosen pattern onto the work/project surface

Wednesday, November 12, 2008

Rose buds


My latest project.....painting rose buds n leaves on the picture frame. I bought this lovely white frame from IKEA. Apply sealer on the surface n then I started painting the rose buds based on the book ..DECORATIVE PAINTING TECHNIQUE by D'Singleton.


The close up


The book


The instructions

Friday, November 7, 2008

Thursday, October 30, 2008

Wednesday, October 29, 2008

Mom's Cafe


Tissue sample


Mom's Cafe plaque, combination between decoupage and folk art. I just painted some flowers, leaves n roof for the cafe n also the words. The rest, I used decoupage technique.... pasted the whole tissue on the surface of the chopping board.